
Page 29 - DP Vol 22 No 1
P. 29
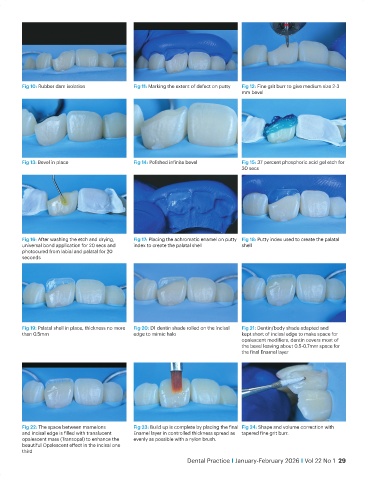
Fig 10: Rubber dam isolation         Fig 11: Marking the extent of defect on putty  Fig 12: Fine grit burr to give medium size 2-3
                                                                                    mm bevel


           Fig 13: Bevel in place               Fig 14: Polished infinite bevel     Fig 15: 37 percent phosphoric acid gel etch for
                                                                                    30 secs


           Fig 16: After washing the etch and drying,   Fig 17: Placing the achromatic enamel on putty  Fig 18: Putty index used to create the palatal
           universal bond application for 20 secs and   index to create the palatal shell   shell
           photocured from labial and palatal for 20
           seconds


           Fig 19: Palatal shell in place, thickness no more   Fig 20: D1 dentin shade rolled on the incisal   Fig 21: Dentin/body shade adapted and
           than 0.5mm                           edge to mimic halo                  kept short of incisal edge to make space for
                                                                                    opalescent modifiers, dentin covers most of
                                                                                    the bevel leaving about 0.5-0.7mm space for
                                                                                    the final Enamel layer


           Fig 22: The space between mamelons   Fig 23: Build up is complete by placing the final  Fig 24: Shape and volume correction with
           and incisal edge is filled with translucent   Enamel layer in controlled thickness spread as   tapered fine grit burr.
           opalescent mass (Transopal) to enhance the   evenly as possible with a nylon brush.
           beautiful Opalescent effect in the incisal one
           third
                                                                  Dental Practice I January-February 2026 I Vol 22 No 1  29