
Page 50 - DP20-2.qxd
P. 50
interview
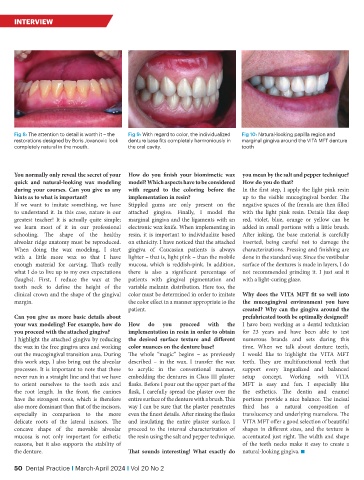
Fig 8: The attention to detail is worth it – the Fig 9: With regard to color, the individualized Fig 10: Natural-looking papilla region and
restorations designed by Boris Jovanovic look denture base fits completely harmoniously in marginal gingiva around the VITA MFT denture
completely natural in the mouth. the oral cavity. tooth
You normally only reveal the secret of your How do you finish your biomimetic wax you mean by the salt and pepper technique?
quick and natural-looking wax modeling model? Which aspects have to be considered How do you do that?
during your courses. Can you give us any with regard to the coloring before the In the first step, I apply the light pink resin
hints as to what is important? implementation in resin? up to the visible mucogingival border. The
If we want to imitate something, we have Stippled gums are only present on the negative spaces of the frenula are then filled
to understand it. In this case, nature is our attached gingiva. Finally, I model the with the light pink resin. Details like deep
greatest teacher! It is actually quite simple; marginal gingiva and the ligaments with an red, violet, blue, orange or yellow can be
we learn most of it in our professional electronic wax knife. When implementing in added in small portions with a little brush.
schooling. The shape of the healthy resin, it is important to individualize based After inking, the base material is carefully
alveolar ridge anatomy must be reproduced. on ethnicity. I have noticed that the attached inserted, being careful not to damage the
When doing the wax modeling, I start gingiva of Caucasian patients is always characterizations. Pressing and finishing are
with a little more wax so that I have lighter – that is, light pink – than the mobile done in the standard way. Since the vestibular
enough material for carving. That’s really mucosa, which is reddish-pink. In addition, surface of the dentures is made in layers, I do
what I do to live up to my own expectations there is also a significant percentage of not recommended grinding it. I just seal it
(laughs). First, I reduce the wax at the patients with gingival pigmentation and with a light-curing glaze.
tooth neck to define the height of the variable melanin distribution. Here too, the
clinical crown and the shape of the gingival color must be determined in order to imitate Why does the VITA MFT fit so well into
margin. the color effect in a manner appropriate to the the mucogingival environment you have
patient. created? Why can the gingiva around the
Can you give us more basic details about prefabricated tooth be optimally designed?
your wax modeling? For example, how do How do you proceed with the I have been working as a dental technician
you proceed with the attached gingiva? implementation in resin in order to obtain for 23 years and have been able to test
I highlight the attached gingiva by reducing the desired surface texture and different numerous brands and sets during this
the wax in the free gingiva area and working color nuances on the denture base? time. When we talk about denture teeth,
out the mucogingival transition area. During The whole “magic” begins – as previously I would like to highlight the VITA MFT
this work step, I also bring out the alveolar described – in the wax. I transfer the wax teeth. They are multifunctional teeth that
processes. It is important to note that these to acrylic in the conventional manner, support every lingualized and balanced
never run in a straight line and that we have embedding the dentures in Class III plaster setup concept. Working with VITA
to orient ourselves to the tooth axis and flasks. Before I pour out the upper part of the MFT is easy and fun. I especially like
the root length. In the front, the canines flask, I carefully spread the plaster over the the esthetics. The dentin and enamel
have the strongest roots, which is therefore entire surface of the denture with a brush. This portions provide a nice balance. The incisal
also more dominant than that of the incisors, way I can be sure that the plaster penetrates third has a natural composition of
especially in comparison to the more even the finest details. After rinsing the flasks translucency and underlying mamelons. The
delicate roots of the lateral incisors. The and insulating the entire plaster surface, I VITA MFT offer a good selection of beautiful
concave shape of the movable alveolar proceed to the internal characterization of shapes in different sizes, and the texture is
mucosa is not only important for esthetic the resin using the salt and pepper technique. accentuated just right. The width and shape
reasons, but it also supports the stability of of the teeth necks make it easy to create a
the denture. That sounds interesting! What exactly do natural-looking gingiva. n
50 Dental Practice i March-April 2024 i Vol 20 No 2