
Page 21 - DP Vol 20 No 4 HR
P. 21
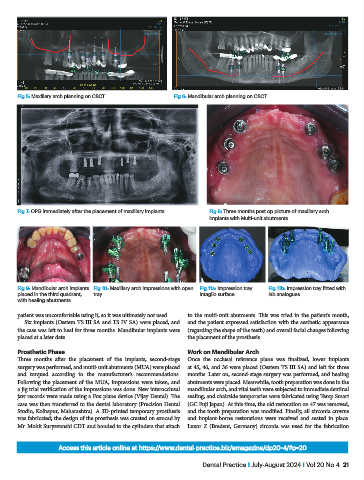
Fig 5: Maxillary arch planning on CBCT             Fig 6: Mandibular arch planning on CBCT


           Fig 7: OPG immediately after the placement of maxillary implants   Fig 8: Three months post op picture of maxillary arch
                                                                          implants with Multi-unit abutments


           Fig 9: Mandibular arch implants  Fig 10: Maxillary arch impressions with open  Fig 11a: Impression tray   Fig 11b: Impression tray fitted with
           placed in the third quadrant,   tray                        intaglio surface      lab analogues
           with healing abutments

           patient was uncomfortable using it, so it was ultimately not used.  to the multi-unit abutments. This was tried in the patient’s mouth,
              Six implants (Osstem TS III SA and TS IV SA) were placed, and   and the patient expressed satisfaction with the aesthetic appearance
           the case was left to heal for three months. Mandibular implants were   (regarding the shape of the teeth) and overall facial changes following
           placed at a later date.                                 the placement of the prosthesis.

           Prosthetic Phase                                        Work on Mandibular Arch
           Three  months  after  the  placement  of  the  implants,  second-stage   Once the occlusal reference plane was finalized, lower implants
           surgery was performed, and multi-unit abutments (MUA) were placed   at 45, 46, and 36 were placed (Osstem TS III SA) and left for three
           and torqued according to the manufacturer’s recommendations.   months. Later on, second-stage surgery was performed, and healing
           Following the placement of the MUA, impressions were taken, and   abutments were placed. Meanwhile, tooth preparation was done in the
           a jig trial verification of the impressions was done. New interocclusal   mandibular arch, and vital teeth were subjected to immediate dentinal
           jaw records were made using a Fox plane device (Vijay Dental). The   sealing, and chairside temporaries were fabricated using Temp Smart
           case was then transferred to the dental laboratory (Precision Dental   (GC Fuji Japan). At this time, the old restoration on 47 was removed,
           Studio, Kolhapur, Maharashtra). A 3D-printed temporary prosthesis   and the tooth preparation was modified. Finally, all zirconia crowns
           was fabricated; the design of the prosthesis was created on exocad by   and implant-borne restorations were received and seated in place.
           Mr. Mohit Suryavanshi CDT and bonded to the cylinders that attach   Luxor Z (Bredent, Germany) zirconia was used for the fabrication


                         Access this article online at https://www.dental-practice.biz/emagazine/dp20-4/#p=20

                                                                       Dental Practice I July-August 2024 I Vol 20 No 4  21