
Page 21 - Dental Technology June 2022
P. 21
20-23-Antonello article-Q8_6-7-8-Ivoclar.qxd 7/13/2022 9:16 PM Page 2
cosmetic section 21
DENTAL TECHNOLOGY, APRIL-JUNE 2022
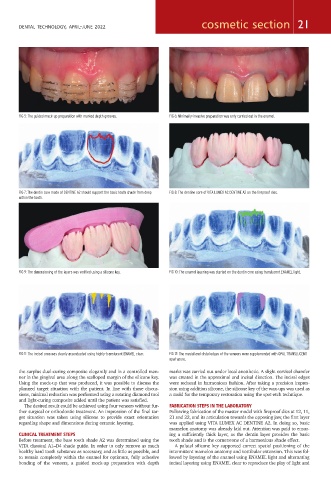
FIG 5: The guided mock-up preparation with marked depth grooves. FIG 6: Minimally-invasive preparation was only carried out in the enamel.
FIG 7: The dentin core made of DENTINE A2 should support the basic tooth shade from deep FIG 8: The dentine core of VITA LUMEX AC DENTINE A2 on the fireproof dies.
within the tooth.
FIG 9: The dimensioning of the layers was verified using a silicone key. FIG 10: The enamel layering was started on the dentin core using translucent ENAMEL light.
FIG 11: The incisal area was clearly accentuated using highly-translucent ENAMEL clear. FIG 12: The mesial and distal edges of the veneers were supplemented with OPAL TRANSLUCENT
opal-azure.
the surplus dual-curing composite elegantly and in a controlled man- marks was carried out under local anesthetic. A slight cervical chamfer
ner in the gingival area along the scalloped margin of the silicone key. was created in the approximal and incisal direction. The incisal edges
Using the mock-up that was produced, it was possible to discuss the were reduced in harmonious fashion. After taking a precision impres-
planned target situation with the patient. In line with those discus- sion using addition silicone, the silicone key of the wax-ups was used as
sions, minimal reduction was performed using a rotating diamond tool a mold for the temporary restoration using the spot-etch technique.
and light-curing composite added until the patient was satisfied.
The desired result could be achieved using four veneers without fur- FABRICATION STEPS IN THE LABORATORY
ther surgical or orthodontic treatment. An impression of the final tar- Following fabrication of the master model with fireproof dies at 12, 11,
get situation was taken using silicone to provide exact orientation 21 and 22, and its articulation towards the opposing jaw, the first layer
regarding shape and dimensions during ceramic layering. was applied using VITA LUMEX AC DENTINE A2. In doing so, basic
mamelon anatomy was already laid out. Attention was paid to ensur-
CLINICAL TREATMENT STEPS ing a sufficiently thick layer, as the dentin layer provides the basic
Before treatment, the base tooth shade A2 was determined using the tooth shade and is the cornerstone of a harmonious shade effect.
VITA classical A1–D4 shade guide. In order to only remove as much A palatal silicone key supported correct spatial positioning of the
healthy hard tooth substance as necessary, and as little as possible, and intermittent mamelon anatomy and vestibular extension. This was fol-
to remain completely within the enamel for optimum, fully adhesive lowed by layering of the enamel using ENAMEL light and alternating
bonding of the veneers, a guided mock-up preparation with depth incisal layering using ENAMEL clear to reproduce the play of light and