Page 26 - DT14-1
P. 26

24-27-KLINGNER article-Q8_6-7-8-Ivoclar.qxd  4/15/2024  8:37 PM  Page 3


               26 prosthetic section                                                          DENTAL TECHNOLOGY, JANUARY-MARCH 2024


                                               FIG 16    FIG 17                                       FIG 18

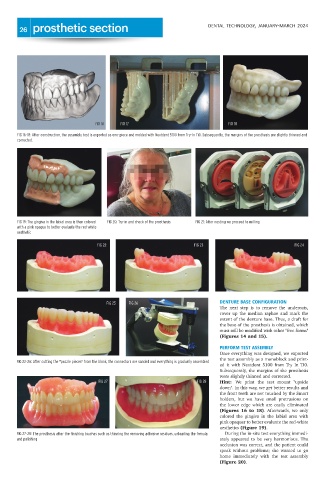
              FIG 16-18: After construction, the assembly test is exported as one-piece and molded with Nextdent 5100 from Try-In Ti0. Subsequently, the margins of the prosthesis are slightly thinned and
              corrected.


              FIG 19: The gingiva in the labial area is then colored  FIG 20: Try-in and check of the prosthesis  FIG 21: After nesting we proceed to milling
              with a pink opaque to better evaluate the red-white
              aesthetic

                                               FIG 22                                   FIG 23                                    FIG 24


                                                   FIG 25    FIG 26                                DENTURE BASE CONFIGURATION
                                                                                                   The  next  step  is  to  remove  the  undercuts,
                                                                                                   cover  up  the  median  raphae  and  mark  the
                                                                                                   extent of the denture base. Thus, a draft for
                                                                                                   the base of the prosthesis is obtained, which
                                                                                                   must still be modified with other "free forms"
                                                                                                   (Figures 14 and 15).

                                                                                                   PERFORM TEST ASSEMBLY
                                                                                                   Once everything was designed, we exported
                                                                                                   the test assembly as a monoblock and print-
             FIG 22-26: After cutting the "puzzle pieces" from the blank, the connectors are sanded and everything is gradually assembled
                                                                                                   ed  it  with  Nextdent  5100  from  Try  In  Ti0.
                                                                                                   Subsequently,  the  margins  of  the  prosthesis
                                                                                                   were slightly thinned and corrected.
                                                FIG 27                                   FIG 28    Hint:  We  print  the  test  mount  "upside
                                                                                                   down". In this way, we get better results and
                                                                                                   the front teeth are not touched by the Smart
                                                                                                   holders,  but  we  have  small  protrusions  on
                                                                                                   the  lower  edge  which  are  easily  eliminated
                                                                                                   (Figures  16  to  18).  Afterwards,  we  only
                                                                                                   colored  the  gingiva  in  the  labial  area  with
                                                                                                   pink opaquer to better evaluate the red-white
                                                                                                   aesthetics (Figure 19).
             FIG 27-28: The prosthesis after the finishing touches such as thinning the removing adhesive residues, unloading the frenula  During the in-situ test everything immedi-
             and polishing                                                                         ately appeared to be very harmonious. The
                                                                                                   occlusion was correct, and the patient could
                                                                                                   speak  without  problems;  she  wanted  to  go
                                                                                                   home  immediately  with  the  test  assembly
                                                                                                   (Figure 20).
   21   22   23   24   25   26   27   28   29   30   31