


Page 21 - Dental Practice South Asia 18-6
P. 21
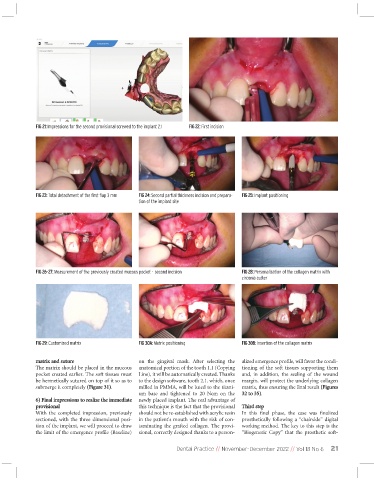
FIG 21: Impressions for the second provisional screwed to the implant 2.1   FIG 22: First incision


              FIG 23: Total detachment of the first flap 3 mm   FIG 24: Second partial thickness incision and prepara-  FIG 25: Implant positioning
                                                 tion of the implant site


              FIG 26-27: Measurement of the previously created mucous pocket - second incision  FIG 28: Personalization of the collagen matrix with
                                                                                     zirconia cutter


              FIG 29: Customized matrix          FIG 30A: Matrix positioning         FIG 30B: Insertion of the collagen matrix


             matrix and suture                   on  the  gingival  mask.  After  selecting  the  alized emergence profile, will favor the condi-
             The matrix should be placed in the mucous  anatomical portion of the tooth 1.1 (Copying  tioning  of  the  soft  tissues  supporting  them
             pocket created earlier. The soft tissues must  Line), it will be automatically created. Thanks  and,  in  addition,  the  sealing  of  the  wound
             be hermetically sutured on top of it so as to  to the design software, tooth 2.1. which, once  margin, will protect the underlying collagen
             submerge it completely (Figure 31).  milled in PMMA, will be luted to the titani-  matrix, thus ensuring the final result (Figures
                                                 um  base  and  tightened  to  20  Ncm  on  the  32 to 35).
             6) Final impressions to realize the immediate  newly placed implant. The real advantage of
             provisional                         this technique is the fact that the provisional  Third step
             With  the  completed  impression,  previously  should not be re-established with acrylic resin  In  this  final  phase,  the  case  was  finalized
             sectioned,  with  the  three  dimensional  posi-  in the patient's mouth with the risk of con-  prosthetically following a “chairside” digital
             tion of the implant, we will proceed to draw  taminating  the  grafted  collagen.  The  provi-  working method. The key to this step is the
             the limit of the emergence profile (Baseline)  sional, correctly designed thanks to a person-  “Biogeneric  Copy”  that  the  prosthetic  soft-

                                                               Dental Practice // November-December 2022 // Vol 18 No 6  21

