


Page 56 - DP Vol 20 No 3
P. 56
Implant dentIstry  sectIon


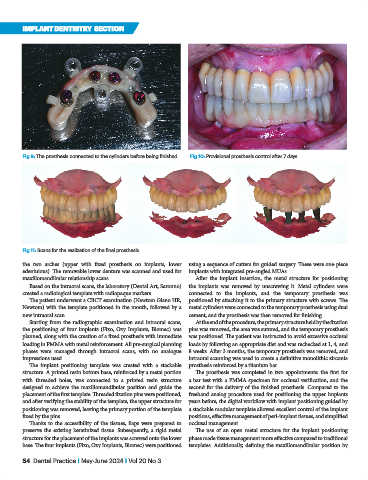
           Fig 9: The prosthesis connected to the cylinders before being finished.  Fig 10: Provisional prosthesis control after 7 days.


           Fig 11: Scans for the realization of the final prosthesis.

           the two arches (upper with fixed prosthesis on implants, lower   using a sequence of cutters for guided surgery. These were one-piece
           edentulous). The removable lower denture was scanned and used for   implants with integrated pre-angled MUAs.
           maxillomandibular relationship scans.                     After the implant insertion, the metal structure for positioning
             Based on the intraoral scans, the laboratory (Dental Art, Saronno)   the implants was removed by unscrewing it. Metal cylinders were
           created a radiological template with radiopaque markers.  connected to the implants, and the temporary prosthesis was
             The patient underwent a CBCT examination (Newtom Giano HR,   positioned by attaching it to the primary structure with screws. The
           Newtom) with the template positioned in the mouth, followed by a   metal cylinders were connected to the temporary prosthesis using dual
           new intraoral scan.                                    cement, and the prosthesis was then removed for finishing.
             Starting from the radiographic examination and intraoral scans,   At the end of the procedure, the primary structure held by the fixation
           the positioning of four implants (Fixo, Oxy Implants, Biomec) was   pins was removed, the area was sutured, and the temporary prosthesis
           planned, along with the creation of a fixed prosthesis with immediate   was positioned. The patient was instructed to avoid excessive occlusal
           loading in PMMA with metal reinforcement. All pre-surgical planning   loads by following an appropriate diet and was rechecked at 1, 4, and
           phases were managed through intraoral scans, with no analogue   8 weeks. After 3 months, the temporary prosthesis was removed, and
           impressions used.                                      intraoral scanning was used to create a definitive monolithic zirconia
             The implant positioning template was created with a stackable   prosthesis reinforced by a titanium bar.
           structure. A printed resin bottom base, reinforced by a metal portion   The prosthesis was completed in two appointments: the first for
           with threaded holes, was connected to a printed resin structure   a bar test with a PMMA specimen for occlusal verification, and the
           designed to achieve the maxillomandibular position and guide the   second for the delivery of the finished prosthesis. Compared to the
           placement of the first template. Threaded fixation pins were positioned,   freehand analog procedure used for positioning the upper implants
           and after verifying the stability of the template, the upper structure for   years before, the digital workflow with implant positioning guided by
           positioning was removed, leaving the primary portion of the template   a stackable modular template allowed excellent control of the implant
           fixed by the pins.                                     positions, effective management of peri-implant tissues, and simplified
             Thanks to the accessibility of the tissues, flaps were prepared to   occlusal management.
           preserve the existing keratinized tissue. Subsequently, a rigid metal   The use of an open metal structure for the implant positioning
           structure for the placement of the implants was screwed onto the lower   phase made tissue management more effective compared to traditional
           base. The four implants (Fixo, Oxy Implants, Biomec) were positioned   templates. Additionally, defining the maxillomandibular position by

           54  Dental Practice I May-June 2024 I Vol 20 No 3

