
Page 28 - DT 15-1
P. 28
26-29-Prandtner_6-7-8-Ivoclar.qxd 01-05-2025 07:45 Page 3
28 implantology section DENTAL TECHNOLOGY, JANUARY-MARCH 2025
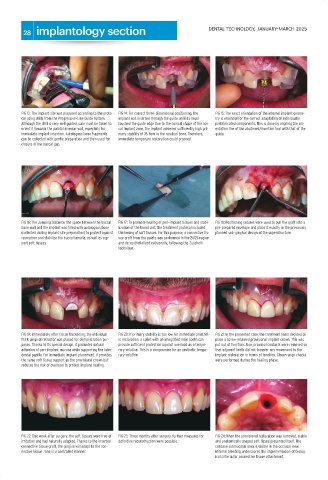
FIG 13: The implant site was prepared according to the proto- FIG 14: For correct three-dimensional positioning, the FIG 15: The exact orientation of the internal implant geome-
col using drills from the Progressive-Line Guide system. implant was inserted through the guide until its head try is essential for the correct adaptation of individually
Although the drill is very well guided, care must be taken to touched the guide edge Due to the conical shape of the api- prefabricated components. This is done by aligning the ori-
orient it towards the palatal alveolar wall, especially for cal implant zone, the implant achieved sufficiently high pri- entation line of the abutment/insertion tool with that of the
immediate implant insertion. Autologous bone fragments mary stability of 35 Ncm in the residual bone. Therefore, guide.
can be collected with gentle preparation and then used for immediate temporary restoration could proceed.
closure of the buccal gap.
FIG 16: The Jumping Distance, the space between the buccal FIG 17: To promote healing of peri-implant tissues and stabi- FIG 18: Positioning sutures were used to pull the graft into a
bone wall and the implant was filled with autologous bone lization of the blood clot, the treatment protocol included pre-prepared envelope and place it exactly in the previously
(collected during implant site preparation) to protect against thickening of soft tissues. For this purpose, a connective tis- planned sub-gingival design of the superstructure.
resorption and stabilize the buccal lamella, as well as sup- sue graft from the palate was performed in the 24/25 region
port soft tissues. and de-epithelialized extraorally, following the Zucchelli
technique.
FIG 19: Immediately after tissue thickening, the individual FIG 20: If primary stability is too low for immediate prosthet- FIG 21: In the presented case, the treatment team decided to
PEEK gingival retractor was placed for demonstration pur- ic restoration, a splint with an integrated resin tooth can place a screw-retained provisional implant crown. This was
poses. Thanks to its special design, it promotes natural provide sufficient protection against overload as a tempo- put out of function. Also, proximal contacts were removed so
adhesion of peri-implant mucosa while supporting the inter- rary solution. This is a compromise for an aesthetic tempo- that adjacent teeth did not transfer any movement to the
dental papilla. For immediate implant placement, it provides rary solution. implant restoration in terms of function. Close-range checks
the same soft tissue support as the provisional crown but were performed during the healing phase.
reduces the risk of overload to protect implant healing.
FIG 22: One week after surgery, the soft tissues were free of FIG 23: Three months after surgery, further measures for FIG 24: When the provisional restoration was removed, stable
irritation and had naturally adapted. Thanks to the inserted definitive reconstruction were possible. and anatomically shaped soft tissue presented itself. The
connective tissue graft, the gingiva will adapt to the con- concave submucosal area is visible in the occlusal view.
nective tissue zone in a controlled manner. Minimal bleeding underscores the implementation of biolog-
ical criteria for connective tissue attachment.