
Page 11 - DT Vol 15 No 3
P. 11
implantology I
DENTAL TECHNOLOGY, JULY-SEPTEMBER 2025 11
STEP 4: SURGICAL PHASE
The surgical guide was seated in position using anchor pins. The guide was
tooth- and tissue-supported (Figures 13a,13b and 13c). This ensured that
the surgical guide obtained stability both from the mucosa and teeth. The
implants were placed first and then the extractions of the remaining teeth
were carried out. Multi-units (implants) were placed in position according to
the gingival height thickness, which was already determined in the planning
software (Figures 14 and 15).
STEP 5: TEMPORIZATION STAGE
A postoperative CBCT was taken to confirm the planned and executed
implant positions. Pickup of the temporary prosthesis was done intraorally.
The intaglio surface of the prosthesis was finished and the PMMA was
screwed over the multi-units. Shim stock drag, protrusive and laterotrusive
movements were checked for. Occlusal prematurities were corrected to
achieve simultaneous bilateral contacts, or the so-called implant-protected Fig 4: Full mouth x-ray of the patient
occlusion (Figure 16).
Fig 5-7: Face scan data recorded for determining the smile line, lip line, and esthetics of the prosthesis
Fig 8-9: Implants planned in the prosthetic position using the exoplan software
STEP 6: PATIENT INSTRUCTIONS
AND FOLLOW-UP
This is a very important step in immediate loading for
full-mouth rehabilitation. The patient was instructed
to have a semi-solid diet for a period of 4 weeks until
secondary stability was completely established. He was
warned not to eat hard foods at all. Follow-up every
7 days until 2 months was carried out. In this phase of
temporization and osseointegration, the PMMA required
timely corrections, and the implants required regular
radiographs to check for any signs of bone loss, mucositis,
loosening, or breakage of the temporary prosthesis.
STEP 7: REMOVAL OF PROSTHESIS AND PATIENT
CONSIDERATIONS
Once the implants were osseointegrated, the temporary
prosthesis was unscrewed. Patient feedback was taken
regarding any corrections in shape, size, and shade of
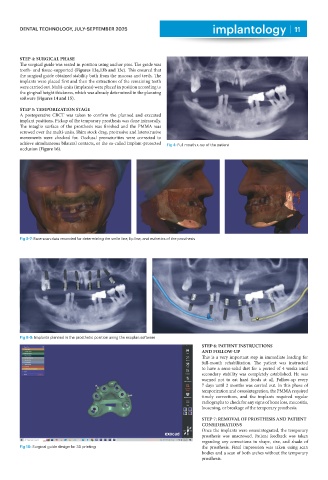
Fig 10: Surgical guide design for 3D printing the prosthesis. Final impression was taken using scan
bodies and a scan of both arches without the temporary
prosthesis.