
Page 26 - DP20-2.qxd
P. 26
implantology section
A Comprehensive Analysis of
Digital vs. Conventional Techniques
in Dental Implantology
Domenico Benagiano DDS and Claudia Salerno DDS
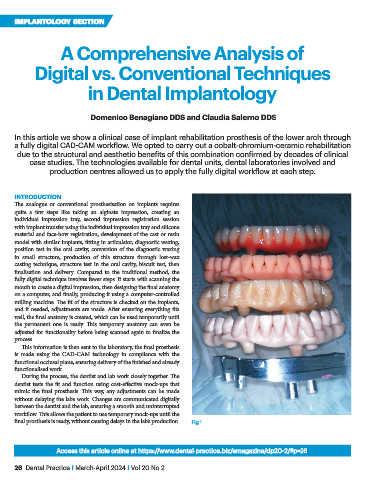
In this article we show a clinical case of implant rehabilitation prosthesis of the lower arch through
a fully digital CAD-CAM workflow. We opted to carry out a cobalt-chromium-ceramic rehabilitation
due to the structural and aesthetic benefits of this combination confirmed by decades of clinical
case studies. The technologies available for dental units, dental laboratories involved and
production centres allowed us to apply the fully digital workflow at each step.
InTroDuCTIon
The analogue or conventional prosthesisation on implants requires
quite a few steps like taking an alginate impression, creating an
individual impression tray, second impression registration session
with implant transfer using the individual impression tray and silicone
material and face-bow registration, development of the cast or resin
model with similar implants, fitting in articulator, diagnostic waxing,
position test in the oral cavity, conversion of the diagnostic waxing
in small structure, production of this structure through lost-wax
casting technique, structure test in the oral cavity, biscuit test, then
finalisation and delivery. Compared to the traditional method, the
fully digital technique involves fewer steps. It starts with scanning the
mouth to create a digital impression, then designing the final anatomy
on a computer, and finally, producing it using a computer-controlled
milling machine. The fit of the structure is checked on the implants,
and if needed, adjustments are made. After ensuring everything fits
well, the final anatomy is created, which can be used temporarily until
the permanent one is ready. This temporary anatomy can even be
adjusted for functionality before being scanned again to finalize the
process.
This information is then sent to the laboratory, the final prosthesis
is made using the CAD-CAM technology in compliance with the
functional occlusal plane, ensuring delivery of the finished and already
functionalised work.
During the process, the dentist and lab work closely together. The
dentist tests the fit and function using cost-effective mock-ups that
mimic the final prosthesis. This way, any adjustments can be made
without delaying the lab’s work. Changes are communicated digitally
between the dentist and the lab, ensuring a smooth and uninterrupted
workflow. This allows the patient to use temporary mock-ups until the
final prosthesis is ready, without causing delays in the lab’s production. Fig 1
Access this article online at https://www.dental-practice.biz/emagazine/dp20-2/#p=26
26 Dental Practice I March-April 2024 I Vol 20 No 2