
Page 16 - DT 15-1
P. 16
10-21-Claudio_6-7-8-Ivoclar.qxd 01-05-2025 07:56 Page 7
16 prosthetic section DENTAL TECHNOLOGY, JANUARY-MARCH 2025
After isolating the teeth with Vaseline to facilitate easy removal, the 41 to 43).
self-curing material (Luxatemp, DMG—or alternatives) is placed inside Upon receiving both patient approval and satisfactory esthetic and
the templates. functional outcomes, we can confidently affirm that the project is
Once the mock-up is molded, the patient can directly perceive the essentially complete.
intended result. All critical components—Esthetics, Function, Perioral Integration,
The clinician can verify esthetic integration, perform phonetic and Occlusion—are defined. From this point forward, the only focus is
assessments, and confirm mock-up harmony within the oral environ- on accurately transferring these designs into temporaries and subse-
ment (Figures 35 and 36). quently into final restorations.
The esthetic transformation is evident, particularly in views with The last task is reconstruction of the upper posterior sectors through
perioral soft tissues (Figures 37 and 38). anatomical tooth mounting.
At this point, the clinician also assesses whether centric relation cor- However, it becomes clear at this design stage that in addition to
responds to the laboratory-defined position (Figures 39 and 40), anterior assembly (and anterior guide reconstruction), it is absolutely
and checks protrusive and lateral mandibular movements (Figures necessary to rehabilitate the lower occlusion.
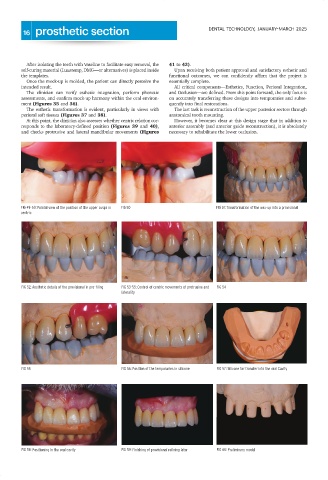
FIG 49-50: Palatal view of the position of the upper cusps in FIG 50 FIG 51: Transformation of the wax-up into a provisional
centric
FIG 52: Aesthetic details of the provisional in pre-filing FIG 53-55: Control of centric movements of protrusive and FIG 54
laterality
FIG 55 FIG 56: Position of the temporaries in silicone FIG 57: Silicone for transfer into the oral Cavity
FIG 58: Positioning in the oral cavity FIG 59: Finishing of provisional relining later FIG 60: Preliminary model