Page 34 - DP Vol 20 No 4 HR
P. 34

IMPLANT DENTISTRY SECTION


                                                                                       copings  were splinted using  dental  floss,
                                                                                       over which pattern resin was applied to
                                                                                       maintain the rigidity of the assembly
                                                                                       (Figures 9 and 10). This is done to ensure
                                                                                       no movement of the open tray impression
                                                                                       copings during the final impression, after
                                                                                       which  rubber  base  material  was  used  for
                                                                                       the final impression. If any movement is
                                                                                       noticed in the copings, redo everything
                                                                                       before considering that the lab could fix it
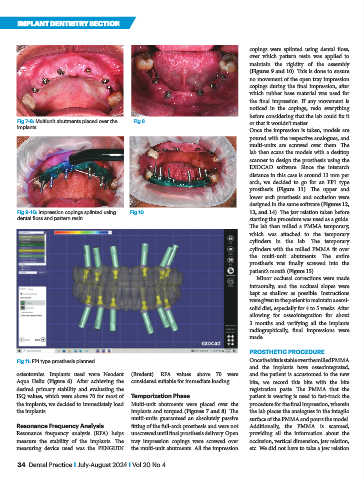
           Fig 7-8: Multiunit abutments placed over the   Fig 8                        or that it wouldn’t matter.
           implants                                                                    Once the impression is taken, models are
                                                                                       poured with the respective analogues, and
                                                                                       multi-units are screwed over them. The
                                                                                       lab then scans the models with a desktop
                                                                                       scanner to design the prosthesis using the
                                                                                       EXOCAD software. Since the interarch
                                                                                       distance in this case is around 13 mm per
                                                                                       arch, we decided to go for an FP1 type
                                                                                       prosthesis  (Figure 11).  The  upper  and
                                                                                       lower  arch prosthesis and occlusion were
                                                                                       designed in the same software (Figures 12,
           Fig 9-10: Impression copings splinted using   Fig 10                        13, and 14). The jaw relation taken before
           dental floss and pattern resin                                              starting the procedure was used as a guide.
                                                                                       The lab then milled a PMMA temporary,
                                                                                       which was attached to the temporary
                                                                                       cylinders in the lab. The temporary
                                                                                       cylinders with the milled PMMA fit over
                                                                                       the  multi-unit  abutments.  The  entire
                                                                                       prosthesis was finally screwed into the
                                                                                       patient’s mouth (Figure 15).
                                                                                         Minor occlusal corrections were made
                                                                                       intraorally, and the occlusal slopes were
                                                                                       kept as shallow as possible. Instructions
                                                                                       were given to the patient to maintain a semi-
                                                                                       solid diet, especially for 4 to 5 weeks. After
                                                                                       allowing for osseointegration for about
                                                                                       3 months and verifying all the implants
                                                                                       radiographically, final impressions were
                                                                                       made.

                                                                                       PROSTHETIC PROCEDURE
           Fig 11: FP1 type prosthesis planned                                         Once the bite is stable over the milled PMMA
                                                                                       and the implants have osseointegrated,
           osteotomies. Implants used were Neodent   (Bredent). RFA values above 70 were   and the patient is accustomed to the new
           Aqua Helix  (Figure  6). After achieving the   considered suitable for immediate loading.  bite, we record this bite with the bite
           desired primary stability and evaluating the                                registration paste. The PMMA that the
           ISQ values, which were above 70 for most of   Temporization Phase           patient is wearing is used to fast-track the
           the implants, we decided to immediately load   Multi-unit abutments were placed over the   procedure for the final impression, wherein
           the implants.                        implants and torqued (Figures 7 and 8). The   the lab places the analogues in the intaglio
                                                multi-units guaranteed an absolutely passive   surface of the PMMA and pours the model.
           Resonance Frequency Analysis         fitting of the full-arch prosthesis and were not   Additionally, the PMMA is scanned,
           Resonance frequency analysis (RFA) helps   unscrewed until final prosthesis delivery. Open   providing  all  the information about  the
           measure the stability of the implants. The   tray impression copings were screwed over   occlusion, vertical dimension, jaw relation,
           measuring device used was the PENGUIN   the multi-unit abutments. All the impression   etc. We did not have to take a jaw relation

           34  Dental Practice I July-August 2024 I Vol 20 No 4
   29   30   31   32   33   34   35   36   37   38   39